Amikor létrehoz vagy importál egy objektumot, pl. a 3D Warehouse oldalról, ahhoz nincsen fényforrás hozzárendelve. Valósághű jelenet létrehozásához fényforrásokat kell hozzáadni az objektumhoz.
Miután hozzáadott egy fényt az objektumhoz, finomhangolhatja az egyes fények különböző beállításait.
Az ARCHLine -ben különböző lámpák használhatók. XP:
- Spotlámpák
- Gömblámpák
- Lineáris fények (LED szalagok)
- Világító szöveg
A lamp is composed of a library object and one or more light sources ( Spot lights or Sphere lights only) attached to it. You can attach a light source only to a library object.
Spotlight
Spotlight provides a conical light source which emits light from a single point in one direction.
Examples: desk lamps, street lights or stage lighting.
By changing how wide the cone angle is, you can control how much the scene is illuminated.
The width of the cone can also determine whether the light is hard or soft.
Spotlights are useful for creating an obvious fall off from light to dark.
Sphere Light
A spherical light can be represented as a single point of light in 3D space fromwhich light is emitted equally in all directions. The effect is similar to a common incandescent light bulb. Sphere lights are useful not only because they can simulate light sources like light bulbs or candles, but also because they can be used to light areas with a fall off in all directions.
Add/Edit light source
1. Ribbon Bar
Select the Ribbon Bar – Interior tab - Lighting – Add/Edit light source command, and then select an object. Once an object is selected, the Light manager appears.
2. Popup menu
You can attach a light source to a library object by selecting the Lighting – Add/Edit light source command in its Popup menu as well. Click on this command and the Light manager appears.

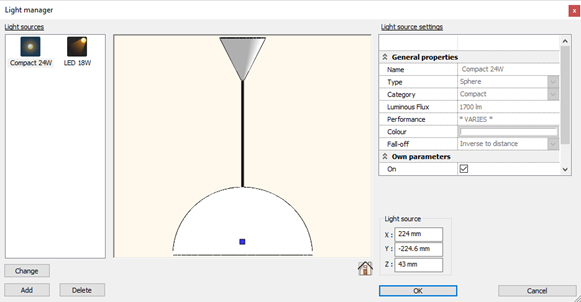
On the left side of the dialogue you can see the attached light sources. Click a light source to view and edit it. In the middle of the dialogue you can see the position and direction of the selected light source. You can modify the position of the light source, the cone angles and the target point of the light source by clicking on the appropriate marker. You can select top/bottom/left/right/back/front view with the view button. For more precision, it is possible to specify the light source and target point coordinates manually, too.
On the right side of the dialog you can set the own parameters of the light source: the on/off state and brightness.
Add light source
To add a new light source to an object, click Add. In the Light sources dialog you can browse and select the appropriate light source.
Change light source
To replace the selected light source to another one, click Change. In the Light sources dialog you can browse and select the appropriate light source.
Delete light source
To delete the selected light source, click Delete.
Saving lamp into library
You can save the selected lamp with attached lights into an object library. You have to decide whether to overwrite the original library object or to create a copy of it.
If you confirm the question, the original object will be overwritten, otherwise a new object will be created and you have to name it.
By pressing cancel at this point, no object will be saved into the library.
If you try to save an object in a write-only library like factory default objects in the Design Center, the following dialog appears:
- Linear lights (LED strips)
LED strips are standalone objects. The light is emitted along their surfaces uniformly.

Creating LED strip:
1. Click the 2D drawing or 3D model where you want to draw the LED strip.
2. Start the Ribbon Bar – Interior tab - Lighting - LED light strip command.
3. Draw the path of the LED strip.
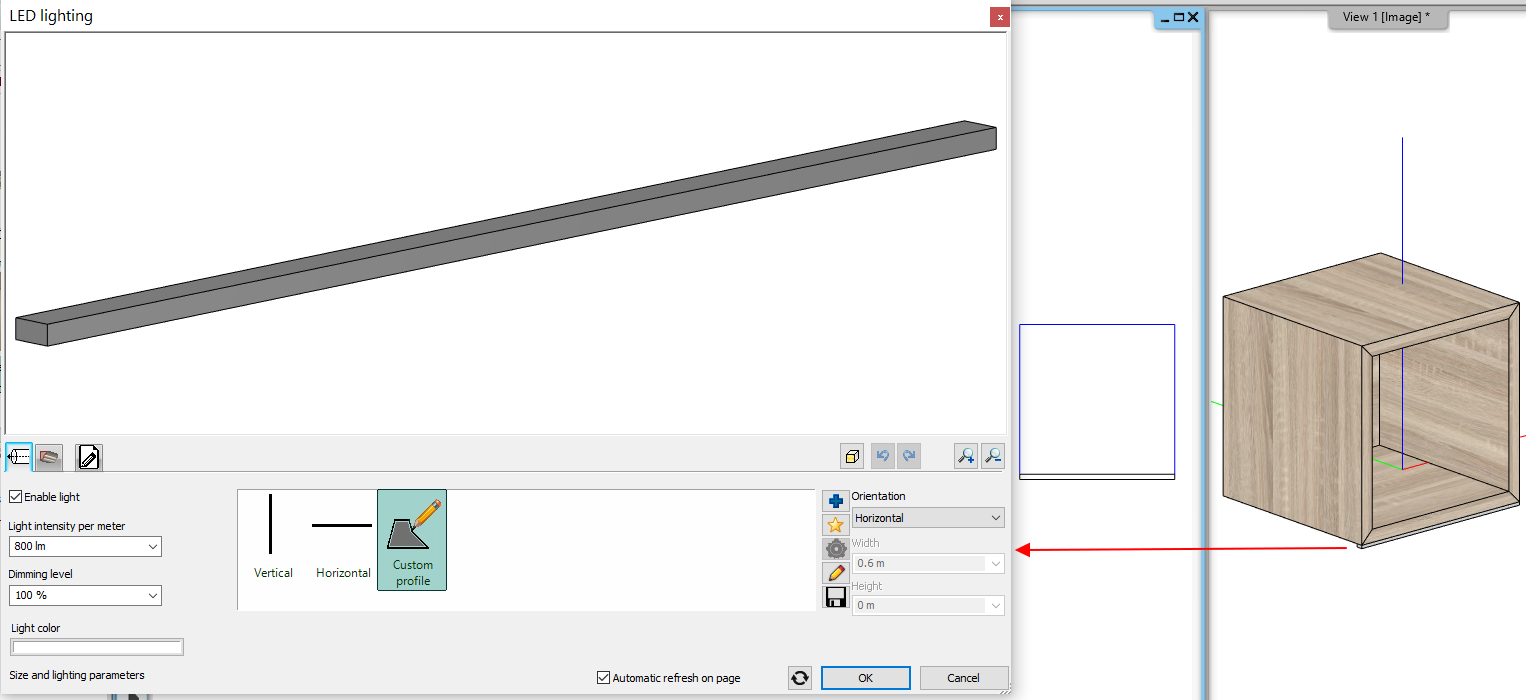
4. After pressing Enter, the LED Ribbon Properties dialog box appears. Specify the LED lighting properties.
Main parameters:
-Light on
Enable 'Lighting on' to turn on the LED strip light.
-Intensity per meter (lumen)
Select or type a value to adjust the the LED strip.
-Dimming level
You can specify the value for modifying the dimming level. 100% means that it adjusts the same dimming level as the original dimming level, while providing a different value to reduce or increase the original dimming level.
-Light color
Specify the color of the LED strip.
Cross-section profile and materials
You may specify any cross-section profile and material.
The cross-section profile
You can choose a cross-section profile or by clicking on the “Blue plus” button you can search the right one in Profile Library. You have several option: you can draw a new profile, also you can edit the selected profile properties or the current cross-sectional contour.
Modifying the Width and Height values of the original you may use different sizes of cross-section.
Material
The physical material of the LED strip can be selected here.
Example:
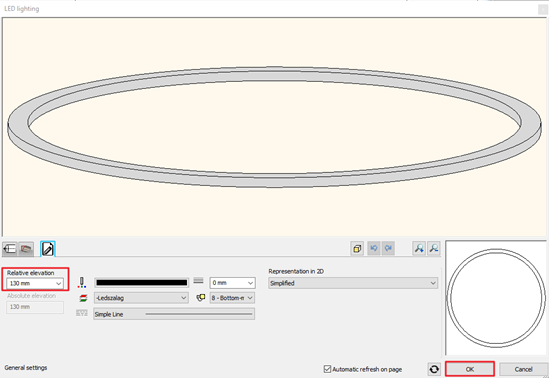
Specify LED strip to the bottom of the cylindrical desk on the floor plan.
In the 2D view start the LED light strip command from Ribbon bar / Interior / Lighting.
The path of the LED strip is given by a circle passing through three points.
1. From the appearing menu select Circle - 3 points command.
2 Specify three points on the inner circle of the desk.
3. The LED lighting dialogue appears.
4. The light properties can be given on the Size and Lighting parameters tab.
5. Go to the General settings tab and set the Relative elevation to required height so the LED strip may be just below the desk, then with the OK button close the dialogue.

Start rendering.

Luminous Text
Luminous text is often used for decorative lighting.
Location of command: Ribbon Bar - Interior tab – Lighting – Luminous text
With this command we can quickly and easily place lighting 3D text with any flat surface.
Applies to external or indoor lighting, backlight with any colour and brightness.
Creating luminous text:
1. Start the Interior tab – Lighting – Luminous text command.
2. Enter the text in the appearing dialog window.
3. Click on the surface where you place the luminous text on the 3D model.
4. Enter the starting point and the direction of the text.
5. Enter the thickness of the luminous text.
6. After drawing, the luminous text property dialog appears and you can set the properties of luminous text.
You can edit the text of the luminous text and the text properties on this panel.
Materials and lighting parameters
On the "Materials and Lighting" tab, you can specify the brightness and colour of luminous text and turn it on / off them.

General settings
You can check and modify the relative height and the representation in 2D of the luminous text.

Hozzászólások
0 hozzászólás
A cikkhez nem írhatók újabb hozzászólások.